Pyro code for the inverse of a bijective NN from Normalizing Flows

As a bit of background, I’m using Pyro to generate a NN that can do Normalizing Flows and have been working on a toy problem to start. A few features in my code that are a departure from the example:

  1. I have multiple layers and not just one spline. I used a model class that I made to add additional layers (combo of splines [quad, linear], and leaky ReLU functions).
  2. I manipulated the code a bit to run off the GPU.

As a toy problem I’ve done a base of a normalized gaussian, to a normalized double humped gaussian (i.e. two gaussians added together with different values for \mu and divided by 2 to keep \int_\mathbb{R} p_x(x)\ dx=1 and \int_\mathbb{R} p_z(z)\ dz=1).

In the end, I then get a nice result for the forward direction,

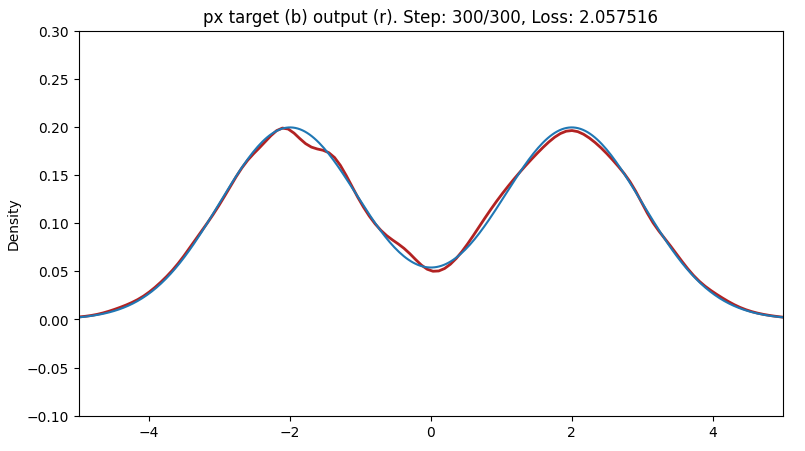
but now I want to go “the other way”, i.e. from the target to the base.

\qquad
\qquad
So my question then: What code do I use to specify that I want flow_dist \rightarrow flow_dist.inverse? In the forward direction I get there by saying:

\qquadflow_dist.sample(torch.Size([1000,]))

which I’m assuming means that it takes 1000 samples from my base distribution (the single hump gaussian distribution) and puts them through the NN to approximate an output of values that when viewed as a KDE look like a double hump gaussian. How then do I do something like:

\qquad flow_dist.inv_sample(torch.Size([1000,]))

which would effectively be taking 1000 samples from the double hump gaussian side, and passing them back through to NN to then approximate the single hump gaussian.

\qquad
\qquad
The main pieces of my code are almost identical to the example on the Pyro norm flows example (2 pieces that don’t follow the example):

  1. pseudo_data = randomly generated double hump norm gaussian distributed x datapoints instead of two circles
  2. transforms = list of parameters from my model class for multiple splines and leaky relu transformations

\qquad
Otherwise:
base_dist = dist.Normal(torch.zeros(1).to(device), torch.ones(1).to(device))
flow_dist = dist.TransformedDistribution(base_dist, transforms)

flow_dist = dist.TransformedDistribution(base_dist, transforms)
dataset = torch.tensor(pseudo_data, dtype=torch.float).to(device)
optimizer = torch.optim.Adam(NormFlowModel.parameters(), lr=LR)

for step in range(steps):
\qquadoptimizer.zero_grad()
\qquadloss = -flow_dist.log_prob(dataset).mean()
\qquadloss.backward()
\qquadoptimizer.step()

Lastly, here’s a link to the code which may be useful given that I had to make a user defined class for the parameters and I manipulated some things to run it off the GPU

Terrible_Code_Written_By_A_Mathematician

Thanks for the help :slight_smile:

-Stefan

1 Like

For anyone who comes across this I found the solution to my problem. You have to use the called transforms themselves (see posted code) in reverse order as inv, OR make an inv_transforms list where you call them from.

From the example code I removed the Leaky ReLUs because I didn’t know how to import them into the transforms call to be honest… So that’s one small thing to figure out. Otherwise, after making the Model Class, it’s important to understand the model class really only served as a shell! It then isn’t really used much later on. What are used and updated are the parameters of the transforms and inv_transforms list

In the model class I made a shell of the inverses

    self.st0_inv = self.st0.inv
    self.st1_inv = self.st1.inv
    self.st2_inv = self.st2.inv
    self.st3_inv = self.st3.inv
    self.st4_inv = self.st4.inv
    self.st5_inv = self.st5.inv
    self.st6_inv = self.st6.inv
    self.st7_inv = self.st7.inv
    self.st8_inv = self.st8.inv
    self.st9_inv = self.st9.inv 
    self.st10_inv = self.st10.inv
    self.st11_inv = self.st11.inv

After the model class put those shells into a nice bundle

inv_transforms = [NormFlowModel.st11_inv,
                  NormFlowModel.st10_inv,
                  NormFlowModel.st9_inv,
                  NormFlowModel.st8_inv,
                  NormFlowModel.st7_inv,
                  NormFlowModel.st6_inv,
                  NormFlowModel.st5_inv,
                  NormFlowModel.st4_inv,
                  NormFlowModel.st3_inv,
                  NormFlowModel.st2_inv,
                  NormFlowModel.st1_inv,
                  NormFlowModel.st0_inv]

Then, I was able to just stick in data to the calls to go from one end to the other (i.e. from base to target or target to base)

Going from data points of the the 1D Gaussian, called XG below, to the 2 Hump Gaussian’s data points (i.e., the “forward” direction)

XG = XG.float()
RR = []
for ii in range(12):
  if ii == 0: 
    RR = transforms[ii](XG.unsqueeze(1))
  else:
    RR = transforms[ii](RR)

plt.hist(RR.cpu().detach().numpy(),bins=100)

Going from data points of the 2 Hump Gaussian’s (called XX below) data points to the 1D Gaussian (i.e., the “backwards” direction)

XX = XX.float()
TT = []
for ii in range(12):
  if ii == 0: 
    TT = inv_transforms[ii](XX.unsqueeze(1))
  else:
    TT = inv_transforms[ii](TT)

plt.hist(TT.cpu().detach().numpy(),bins=100)#

Hope this helps some random lost soul out there one day haha. Here’s my code to a final working copy of my 1D normalizing flow example:

1D Normalizing Flow Example

Cheers,
-Stefan

1 Like